
Sporting range
Training panel
Build any sporting presentation by hand: stand one or two machines anywhere around the crossing point, set what they throw, watch the flight redraw as you work, then shoot it. Save the ones worth keeping and load them again in seconds.
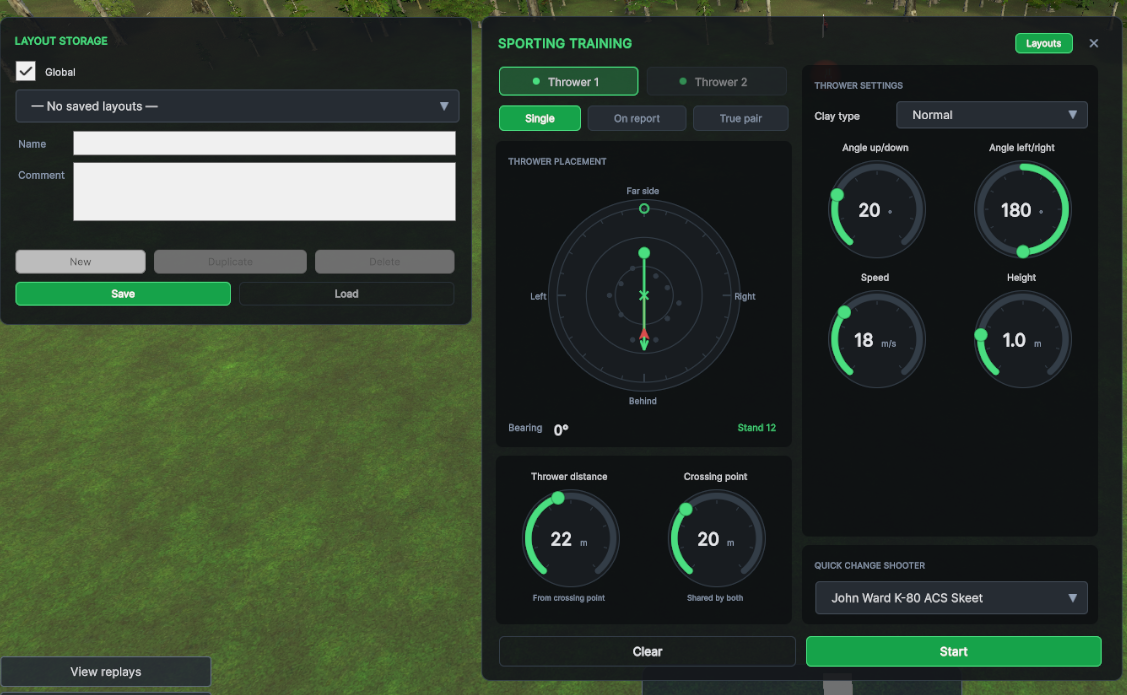
The dial is the control and the preview at once — the face you drag is also the map you read.
What the panel is for
One target, or one pair, built exactly the way you want it and thrown as many times as it takes.
A sporting round gives you a fixed menu. Training does the opposite: you decide where the machine stands, which way it throws and how hard, and then shoot that one presentation until it is beaten.
Everything is arranged around the crossing point — the place in front of the shooter where the target is meant to be broken. The thrower is placed relative to it, and its distance is measured from it.
Two throwers are available. The second one only comes into play when you ask for a pair.
You see the throw, not the numbers
Every change re-arms the machine, and re-arming redraws the flight line on the dial. So a number you change is a curve that moves — you are looking at the presentation, not at a form.
Opening and closing
The panel opens on a clean range, so what you build is the only thing on it.
-
1
Open it from the training button in the Sporting menu. Opening clears anything left on the range, mutes the call microphone, arms the first machine and puts the camera back at the shooting position.
-
2
Build the presentation — placement first, then the four numbers. The machine re-arms after every change, so the flight on the dial is always current.
-
3
Start hands the range to the squad and closes the panel. Clear puts everything back to the starting values. The ✕ in the corner closes without changing anything.
The call microphone is off while the panel is open, on purpose — you are talking to the squad, not calling for a target.
Single, on report, true pair
Choose this first. It decides whether there is a second machine at all.
| Setting | What happens |
|---|---|
| Single | One target from thrower 1. The thrower 2 tab goes grey and the panel switches back to thrower 1, so every dial is pointing at something you can still see. |
| On report | Thrower 2 throws first; thrower 1 follows when it hears the shot. Two shots, one call. |
| True pair | Both machines throw together on the call. |
In both pair modes thrower 2 is the first clay in the air. Set it up on its own tab, and remember that the shooter sees it before the one you started with.
Placing a thrower
The round face on the left is a plan view of the range, seen from above, centred on the crossing point.
Up is away from the shooter, past the crossing point. Right is the shooter’s right, down is back over the shooter’s head, and left is the shooter’s left.
Drag anywhere on the face to swing the machine round. The whole circle is live: a thrower standing behind the shooter and throwing towards the crossing point is an ordinary sporting presentation, not a mistake, so nothing is blocked off.
The face also draws where the shooter is standing, where the other thrower sits, and the line the clay will fly. It is the control and the picture at the same time.
The twelve dots are the classic stands. Click one to land on it exactly, or drag close to one and the bearing snaps to it.
The bearing readout under the dial shows the angle. Click the number to type an exact one; Esc cancels the edit and puts the old value back.
Beside it a small note says Stand n when you are sitting on one of the twelve, or Free when you are anywhere else.
A free placement is saved with the layout and comes back exactly where you left it. Clicking a preset dot always restores that stand’s original position, so there is a way back from any amount of dragging.
The two distances
Both are in metres and they are easy to mix up, so they sit side by side and each says what it measures.
Thrower distance
How far the machine stands from the crossing point, along the bearing you set on the dial. Each thrower has its own.
Together with the bearing, this is the whole of where the machine is.
Crossing point
How far in front of the shooter the targets are meant to cross. Both throwers share it — changing it on one tab changes it on the other.
Moving it moves the whole picture, because everything else is measured from it.
The throw
Four dials and a clay type, all belonging to whichever thrower tab is selected.
| Control | What it does |
|---|---|
| Clay type | Normal, Full side, Rabbit, Rabbit low bounce or Teal. This changes how the clay behaves in the air, not just how it looks. |
| Angle up/down — 0 to 80° | How steeply the machine throws. Low numbers give a driven, flat target; high numbers give a climber or a teal. |
| Angle left/right — 0 to 360° | Which way the machine is pointed. This is a bearing, so it runs the whole circle and rolls over at the top instead of stopping. |
| Speed — 10 to 35 m/s | How hard it is thrown. This is the fastest way to turn a comfortable target into a difficult one without changing its shape. |
| Height — 0 to 5 m | How high the machine itself sits above the ground. |
Angle left/right is captured for you when you place the machine, so it already points sensibly at the crossing point. Change it afterwards to throw across the line rather than at it.
Three ways to set any dial
Every round dial on this panel works the same way. Use whichever suits what you are pointing at the screen with.
Drag
Press anywhere on the face and turn. The value follows the angle, so a big change is one movement.
Arrow keys
Left and right nudge by one step. Hold Shift to move five steps at a time.
Type it
Click the number in the middle and type the value you want. Useful when you are reproducing a target from notes.
Saving a layout
The Layouts chip in the header slides the storage panel out from the side. The panel itself stays where it is.
-
1
Choose who it belongs to. The toggle at the top switches between Global — on the list for everybody — and the current shooter, whose name appears in its place. The dropdown below shows only the layouts in the scope you picked.
-
2
Name it, and say what it is. The comment field is worth using: “left to right crosser, drops late” tells you more six months from now than the name will.
-
3
Save. With nothing selected in the dropdown this stores a new layout; with one selected it updates that one. New starts a blank entry, Duplicate copies the selected layout so you can vary it without losing the original, and Delete removes it.
-
4
Load puts the whole presentation back — both machines, their placements, every number and the pair type. The line under the fields confirms what happened, and turns red if something went wrong.
Save on a selected layout overwrites it. To keep the original, press Duplicate first and edit the copy.
Shooting it
Start turns the presentation on the screen into a round for the squad.
Every shooter in the squad gets the same single presentation, shot from the middle stand, and the scoreboard and top list are cleared so the session starts fresh. The panel closes behind you.
The squad then shoots it the ordinary way, calling for each target, rotating as usual. Come back to the panel whenever you want to change it — the layout you built is still there.
Change one thing at a time
The value of training on one presentation is that it isolates a fault. Move the crossing point, or add five metres per second, and shoot it again — but not both at once, or you will not know which one did the work.
A thrower with no placement cannot be thrown. Set thrower 1 on the dial — and thrower 2 as well if you have asked for a pair — and Start will go through.
Everything on the screen
A quick reference for the whole panel.
| Control | What it does |
|---|---|
| Thrower 1 / Thrower 2 | Which machine the dials on this screen belong to. Thrower 2 is greyed out for a single. |
| Single / On report / True pair | How many targets, and how they are released. |
| Placement dial | Where the machine stands, round the crossing point. Drag for any bearing, click a dot for a classic stand. |
| Bearing | The placement angle as a number. Click it to type one. |
| Thrower distance | 8 to 40 m from the crossing point. Per thrower. |
| Crossing point | 10 to 40 m in front of the shooter. Shared by both throwers. |
| Clay type | Normal, Full side, Rabbit, Rabbit low bounce, Teal. |
| Angle up/down | 0 to 80°. |
| Angle left/right | 0 to 360°, rolls over at the top. |
| Speed | 10 to 35 m/s. |
| Height | 0 to 5 m above the ground. |
| Quick change shooter | Swaps the shooter at the stand without leaving the panel. |
| Layouts | Slides out the storage panel: save, load, duplicate and delete presentations. |
| Clear | Both throwers back to the starting values, on the centre stand, single. |
| Start | Builds the round for the squad and closes the panel. |
| ✕ | Closes the panel, changing nothing. |
A presentation you can rebuild in ten seconds is a presentation you will actually practise. Save the ones that beat you.