
Compak Sporting
Course designer
Build your own Compak courses: place the traps, set what each one throws, write the shooting menu, then save it. Build on the Simulator or at home in your browser, keep them in step with one button, and send any course to anyone with a short code. Your courses sit alongside the built-in ones and are shot the same way.
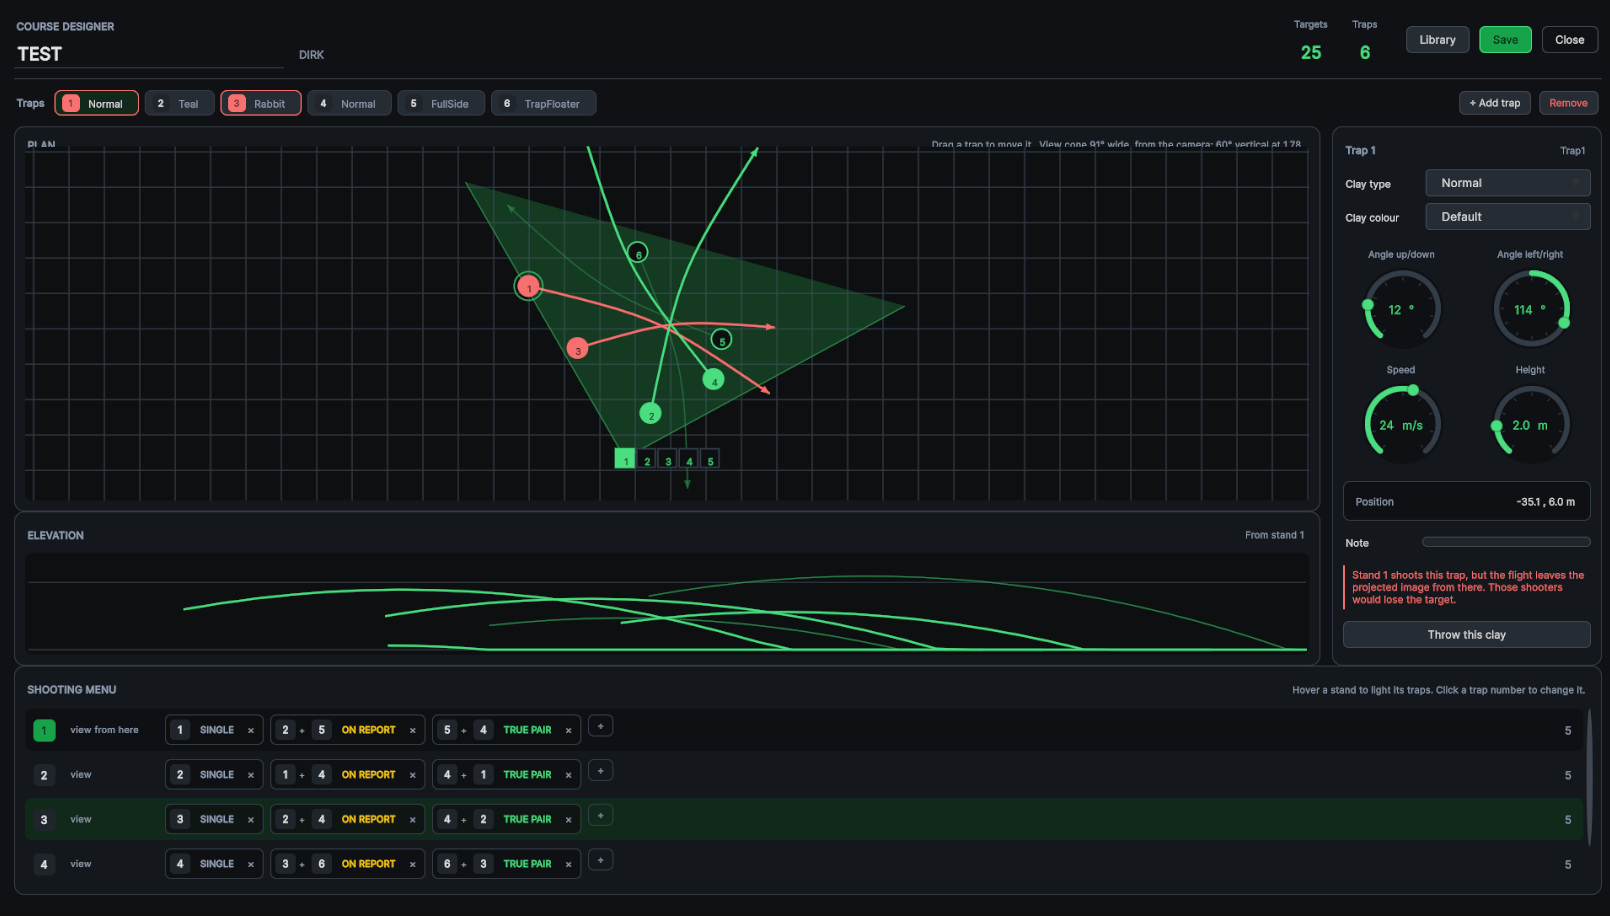
Every trap and every flight drawn at once — a course reads as one shape rather than six settings screens.
What a course is
Two halves, and the designer shows you both at the same time. That is the whole idea behind the screen.
The traps are the machines: where each one stands, which way it throws, how fast, how high, and what kind of clay it puts out. A course can use up to fifteen.
The shooting menu is what each of the five stands shoots, in order, and whether each shot is a single, a pair on report or a true pair.
The stands themselves never move. They belong to the range, not to the course, which is why you only ever place traps.
The map is the document
A course edited one trap at a time has no overview. Here every flight is drawn at once, so you can see the shape of the whole course while you change one part of it.
Three buttons, three jobs
In the Compak menu. They are deliberately separate — choosing a course to shoot is not the same as changing one.
Course designer
Opens the editor, to build a new course or change an existing one. Nothing you do here affects a round until you load the course.
Load course
Shows your saved courses and lets you pick one to shoot. It does not open the editor and it cannot change anything.
Start round
Shoots the course you loaded. With nothing loaded it shoots the built-in course the dropdown names, exactly as before.
The screen
Everything except the map is a way of changing whatever is selected on it.
Plan
The field from above, with every trap and every flight drawn — the selected one bright, the rest dimmed.
Drag a trap to move it; the arrow keys nudge it half a metre, or two metres with Shift. The mouse wheel zooms and dragging empty ground pans — see Moving around the plan below.
Elevation
The same flights from the side, measured from the stand you are looking from.
Height and up-angle are invisible from above, so this is where you check that a tower clears the treeline and a rabbit stays on the floor.
Trap settings
Clay type and colour, then four dials: angle up and down, angle left and right, speed and height.
Drag a dial, nudge it with the arrow keys, or click the number and type it.
Traps
One chip per trap, showing its number and clay. Click a chip to select that trap.
Add trap drops a new machine where the plan is looking. Remove takes the selected one out.
Shooting menu
One row per stand, holding that stand's shots in the order they are called.
Hover a row and only that stand's traps light up on both views.
Library
Your saved courses, and the buttons that move them between Simulators: New, Duplicate, Import, Export and Delete.
Synchronize with cloud keeps them in step with your online library, and gets a course somebody sent you a code for.
Each thrower carries its number in the field itself, floating above the machine, so the map and the range always agree about which trap is which. The numbers appear only while the designer is open.
Moving around the plan
The plan opens on the standard field, but it is not a fence. A tower behind the stands or a long crosser wide of the field is only a scroll away.
| Do this | What happens |
|---|---|
| Mouse wheel | Zooms in and out around the pointer, so the spot you are looking at stays under the mouse. The grid gets coarser as you zoom out |
| Drag empty ground | Pans the view. The right or middle mouse button pans too, even over a trap |
| Fit course | Zooms and pans so every trap, every flight and all five stands are on screen |
| Field view | Back to the standard field box |
| A numbered marker on the edge | A trap that is off screen. The arrow points to it; click the marker to centre the view on that trap and select it |
| Add trap while zoomed or panned | The new trap goes in the middle of what you are looking at — pan behind the stands, press Add trap, and that is where it is. In the field view it goes in front of the middle stand as before |
A course whose traps are outside the field opens already zoomed out to show all of them, so nothing is ever loaded out of sight.
Traps can be dragged well beyond the field — up to two hundred metres from it — which is far more than any real layout needs.
A trap placed behind the stands is drawn red: the view-cone check looks at where the clay starts and its first few metres, and from the stand those are behind the shooter. For an incomer from behind that is expected — throw it once with Throw this clay to see how it enters the picture.
Building a course
-
1
Open Course designer, press Library, then New — or simply start from the course that opens.
-
2
Name it, and put your own name in the field beside it. The name is what other shooters will see.
-
3
Place the traps. Drag each one on the plan, then set its clay, angle, speed and height on the right. Zoom out for anything beyond the field.
The flight redraws as you go, and the machine out in the field moves with it — what you see on the map is what is standing on the range.
-
4
Write the menu along the bottom: for each stand, which traps and in what combination.
-
5
Test the targets you are unsure about with Throw this clay, then press Save.
Writing the shooting menu
Everything on a row is clickable, and the menu cannot be clicked into a state the field disagrees with.
| Click | What happens |
|---|---|
| A trap number | Steps to the next trap the course places — never one you have not put out |
| The label | Cycles single, on report, true pair, following pair; going single to pair adds the second trap for you |
| The cross | Removes that shot |
| The plus | Adds another shot to the stand |
| View | Looks at the field from that stand, moving the view cone and the elevation with it |
The number at the end of each row is that stand's target count, and the Targets figure at the top of the screen is the whole course.
That total is what the scoreboard uses, so a 24- or 30-target course scores correctly without anything else being set.
Removing a trap also removes every shot that called it, and the designer tells you how many it took out. Check the menu afterwards — those stands are now a target or two short.
The view cone
The one piece of feedback a placement tool cannot do without: a target nobody can see is not a target.
Your projector, not a typical one
The green wedge is the part of the world the projector can actually show from the stand you are viewing from. It is taken from the camera, so it matches your installation — throw distance, screen width and lens included.
A trap turns red when its target leaves that wedge from a stand whose menu calls it. The shooter standing there would lose sight of the clay. The trap chip is marked too, and the panel on the right names the stand.
Clays are expected to leave the screen eventually — only the launch and the first few metres have to be visible, which is the part you need in order to mount and shoot.
Red is judged only against the stands that actually shoot that trap. A wide trap sitting off to the side of a stand that never calls it is not a fault, so it is not flagged.
The online designer has no projector to measure, so it uses a standard cone and standard stand positions. The Simulator's own check is the one that counts.
Testing a target
Throw this clay fires the selected trap for real — the same machine, the same clay and the same halo you get in a round.
The designer hides itself so you can watch the flight and comes back on its own after a few seconds. Click or press any key to bring it back sooner.
The plan cannot tell you everything
The map tells you where a clay goes. Only the throw tells you what it looks like from the stand — and that is what a shooter is actually judging.
Saving, and where courses live
A course lives on the Simulator it was built on, and in your cloud library once you synchronise.
Save writes the course to this Simulator. Each course is given an identity of its own when it is created, and the file is named by that rather than by its title.
So renaming a course is only a change of text, two courses can share a name without colliding, and saving the same course twice replaces it instead of leaving copies behind. The same identity is what lets the cloud recognise it as the same course on another Simulator.
Courses are kept in the TrueClays data folder under Courses\compak, one .json file each. They are ordinary text files, and an update does not touch them — a course you build stays yours.
Save always keeps your work
Save writes the course even when the designer is complaining about it. A course with a real problem is simply not offered to shoot until you fix what the message describes.
| Library button | What it does |
|---|---|
| New | Starts an empty course laid out on the field |
| Duplicate | Copies the open course under a new identity, leaving the original untouched |
| Import | Brings in a course somebody sent you as text or a file |
| Export | Puts the course on the clipboard and writes a copy to Courses\export |
| Delete | Removes the open course from this Simulator |
| Synchronize with cloud | Connects this Simulator to your cloud.trueclays.com account, keeps your courses in step with it, and gets a course with a share code — see the next three sections |
The online designer
The same designer, in a web browser. Build at home, shoot at the range.
Log in to cloud.trueclays.com and press Course designer on the home page. You get your cloud library and New course; open a course and it is the editor you know — plan, elevation, trap settings, shooting menu, zoom and pan, Library with Import and Export.
What you save there is saved in your cloud library. The Simulator fetches it the next time you press Synchronize with cloud.
If the same course was changed on a Simulator while you had it open, Save asks before overwriting it.
What only the Simulator can do
Throw this clay and Build field in range need the 3D range, so online they are shown greyed out with a dashed SIMULATOR tag. They are there so you know they exist when you get to the range.
Metric and imperial units can be switched at the top, as on the Simulator.
Connecting and synchronising
Connect a Simulator once. After that one button keeps it and your cloud library in step — and it never overwrites anything without asking.
Connecting a Simulator — once
-
1
In the course designer, press Library, then Synchronize with cloud. Type the email you log in to cloud.trueclays.com with and press Connect.
-
2
A code such as
GHOST-7742appears on the Simulator. At the same time a yellow bar appears at the top of cloud.trueclays.com for that account. -
3
Check the two codes match and press Approve. Within a few seconds the Simulator says it is connected.
It stays connected. To disconnect, press Disconnect in the same window, or remove it under Connected devices on the website.
What a synchronisation does
| The course is | What happens |
|---|---|
| Only on this Simulator | Sent to the cloud. No question — nothing is overwritten |
| Only in the cloud | Brought to this Simulator. No question |
| In both, and the same | Left alone |
| In both, and different | You are asked. Both copies are shown with when they were saved and their revision, the newer one marked. Choose: overwrite the cloud, overwrite this Simulator, keep both (the cloud's is saved as a copy), or skip |
| Deleted online, still here | You are asked whether to put it back in the cloud or leave it out |
With many courses to go through, tick Do the same for the rest and the rest of the questions answer themselves the same way.
Unsaved changes in the designer are saved before a synchronisation starts, so what is on the screen is what goes up. A course that came down replacing the open one is reopened, and the field rebuilt to match.
Nothing is ever deleted by a synchronisation, in either direction. Deleting a course is always something you do yourself, on one side.
Sharing with a code
Send one course to somebody else's Simulator — a club, a friend, a customer — without giving them anything else.
Making a code — online
-
1
Open the course in the online designer and press Share.
-
2
Choose how long it works — 1, 7 or 30 days — and, if you like, once only. Press Create code.
-
3
You get a code such as
CLAY-7K4QM-2XD9P. Copy it, read it out, put it in a message.
Getting a course — on the Simulator
-
1
Press Library, Synchronize with cloud, then Get with code.
-
2
Type the code. Capitals and dashes do not matter. Press Get.
-
3
The course arrives and opens in the designer, ready to shoot. If this Simulator already has it, you are asked: overwrite, keep both, or skip.
Works on any Simulator
The Simulator does not have to be connected to anyone. A public installation can take a course from a customer who walks in with a code.
Exactly as it was
The code carries the course as it was saved when the code was made. Changes you make later are not included — make a new code to send a new version, and it lands on the same course, after asking.
Nothing else goes with it
A code gives that one course. It cannot show your library, and it cannot see into the Simulator that uses it.
The Share panel lists every code you made for the course: whether it is still active, when it runs out, how often it has been used and by which Simulator. Revoke stops a code at once; anyone who already used it keeps their copy.
Sharing without the cloud
A course is one block of text, so it also travels in a message or on a memory stick — no account, no internet at the other end.
-
1
Open the course, press Library, then Export. The course is now on your clipboard.
-
2
Paste it into a message, an email or a forum post and send it.
-
3
On the other Simulator, copy the text, open the library and press Import. It appears in the list, ready to shoot.
Files work too
Import also reads the newest file in Courses\export. Drop a course file in that folder and press Import. The online designer imports and exports the same files.
Importing keeps both
Somebody else's changes to a course you built arrive as a second copy rather than replacing yours, so nothing is lost in a swap.
Shooting a course
-
1
Press Load course and pick one from the list.
-
2
The traps go out on the field and the list closes. Shoot it as you would any Compak round.
-
3
To go back to the built-in courses, choose one in the course dropdown and press Start round. That clears the loaded course and puts the range back as it was.
An ordinary Compak round
Scoring, the scoreboard, squad rotation, the control station and streaming all behave exactly as they do on a built-in course. The only difference is which targets come out.
Every Simulator builds its own round, so a custom course can only be shot where that course already is. Get it onto every Simulator first — a share code is the quickest way — and check they all have the same version before you start.
If something looks wrong
| What you see | What to do |
|---|---|
| A red message across the top | Something would stop a round working — a stand calling a trap that is not placed, or a pair with one trap in it. The message names it; Save still works |
| Traps and flights drawn red | Those targets leave the projected image from a stand that shoots them. Move the trap, turn it, or take it off that stand's menu |
| A trap is missing from the plan | It is outside the view. Look for its numbered marker on the edge and click it, or press Fit course |
| A trap you cannot add | All fifteen trap positions are in use. Remove one you are not using |
| The round shoots the wrong course | A course is still loaded. Choose the course you want in the dropdown and press Start round, which clears it |
| Import does nothing | The clipboard did not hold a course. Copy the whole block of text, from the first brace to the last |
| The connect code expires before you approve | A connect code lasts ten minutes. Press Connect again for a new one; make sure you are logged in to the website with the same email |
| “This Simulator is no longer connected” | It was disconnected under Connected devices on the website. Connect it again |
| “That code is not valid” | The share code is mistyped, has run out, was once-only and already used, or was revoked. Ask for a new one |
| “That code is for a TrueDynamic stage” | The code is fine, but it belongs to the TrueDynamic stage editor, not the course designer |
| “Too many wrong codes” | Too many wrong codes were tried in the last hour. Wait an hour, then type the code carefully |
Limits
Fifteen traps
Per course, placed anywhere within two hundred metres of the field. More than a Compak field normally carries — it is the ceiling, not a target.
Five stands
Fixed by the range, with as many shots on each as you want to write.
On the Simulator, and in the cloud
Every course is a file on the Simulator. Synchronising keeps a copy in your cloud library, and share codes last 1, 7 or 30 days.
A Compak course is six machines and a menu. Once you can see all of it at once, building one takes minutes — at the range or at home — and with a code, the courses you build travel to every other TrueClays in the world.