
TrueClays Custom Trigger
How to Order a Custom Trigger
Simple reference photos help us create a trigger component designed specifically for your shotgun.
Made for Your Shotgun
A Custom Fit Starts With Clear Photos
Every TrueClays custom trigger is created to fit the individual shotgun it will be used with.
To manufacture the component correctly, we need a clear reference photo with a ruler placed beneath the trigger guard.
The goal is not to photograph the shotgun as a product image. The goal is to give us reliable scale, trigger position and trigger guard dimensions.
What We Build
Trigger Insert With Microswitch
- ✔ Slides in behind the trigger
- ✔ Built around your shotgun geometry
- ✔ Includes an integrated microswitch
- ✔ Activates when the trigger is pressed
Take the Photo From Above
Place the camera directly above the trigger blade and keep it centered.
Do not take the photo too close. A little distance makes the measurement easier and more reliable.
Use a Ruler for Scale
Place a ruler beneath the trigger guard so the trigger, trigger guard and ruler are all clearly visible.
The ruler should be readable and positioned as close as possible to the same depth as the trigger guard.
Tell Us Your Handedness
Please tell us if the shooter is right-handed or left-handed.
This helps us prepare the custom trigger correctly for your setup.
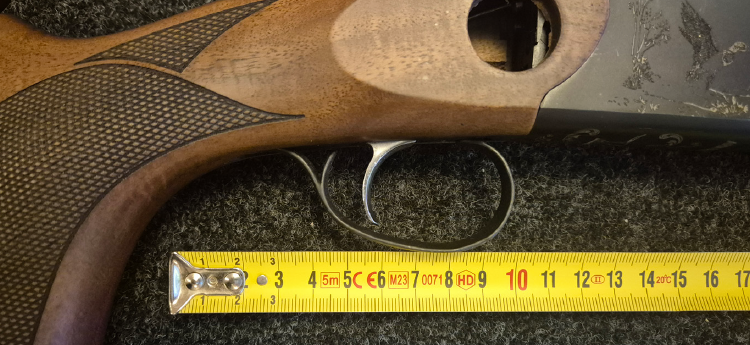
Main Reference Photo
The Photo We Need
We need a photo taken from above, centered over the trigger blade.
Place a ruler beneath the trigger guard. The ruler gives us scale, while the top-down view gives us the shape and position of the trigger area.
Try to avoid angled photos, extreme close-ups or photos where the ruler is far away from the trigger guard.
Important
The shotgun does not need to look perfect in the photo. What matters is that the ruler, trigger blade and trigger guard are clear and usable for measurement.
 Preferred example: camera centered above the trigger blade, ruler beneath the trigger guard.
Depth & Perspective
Why the Ruler Position Matters
The ruler is not only used as a visual reference. It helps us calculate the real size of the trigger guard and trigger area.
For the most accurate result, the ruler should be positioned at approximately the same depth from the camera as the center of the trigger guard.
This avoids perspective distortion and helps us create a component that fits more accurately.
Common Misunderstanding
The Side View Is Only for Depth
Sometimes people focus on taking a photo of the shotgun laying down. That is not the purpose.
The side view is only used to understand the depth relationship between the ruler and the trigger guard.
- ✔ Show where the ruler is placed
- ✔ Show the trigger guard depth
- ✔ Help us reduce perspective error
- ✔ Make the custom fit more accurate
Good Photo
Camera directly above the trigger blade, ruler visible beneath the trigger guard, good lighting and sharp focus.
Avoid This
Do not take the photo too close, from a strong angle, or with the ruler far away from the trigger guard.
Send Extra Photos
If you are unsure, send more than one photo. We will review them and tell you if anything else is needed.
Ready to Order
Send Your Photos to TrueClays
Send the reference photos together with your handedness. We will review the images before creating the custom trigger component for your shotgun.
Contact TrueClays