TrueClays Feature
Shot Timing Analytics
Upload your range recordings and watch your reaction, gun-mount speed and shot placement turn into clear trends — private to your account.
See your timing, not just your score.
Every TrueClays presentation you record holds the shot timing and the pellet & clay geometry — and, if you shoot with a tracker, the gun's movement too. Shot Timing Analytics reads those recordings and turns them into per-shooter timing and aim metrics in the cloud.
Upload straight from the simulator — no file export or manual transfer. You choose which account the data belongs to, and only that account can see it on the web.
You only need an account on cloud.trueclays.com to upload and view your analytics — register on the website first.
Key Advantage
Reaction, Measured
From the tracker path we detect the moment your gun actually starts to move after the call — your true reaction time, separate from how long you then took to break the bird. This is the one metric that needs a tracker; with one fitted, it's plotted across hundreds of targets so your tendencies become obvious.
Where to Find It
In the simulator
Configuration → Shooter Profile
Open the profile you want to analyse and press Upload recordings to send that shooter's data to the cloud.
On the website
Shot Timing Analytics
Log in to cloud.trueclays.com and open the analytics page. You only ever see data tied to your own account.
Step by Step
Upload Your Recordings
Sent straight from TrueClays — nothing to export by hand.
Open the shooter profile
In TrueClays, go to Configuration → Shooter Profile and select the profile whose recordings you want to analyse.
Click “Upload recordings”
The upload dialog opens for that shooter and gathers every recording stored for the selected profile.
Enter your cloud account e-mail
Type the e-mail of your TrueClays Cloud account — the same one you log in to the website with. It must be an existing account; if nothing matches, the dialog shows an error and uploads nothing.
Watch the progress — then you're done
The dialog checks the account, then uploads with a live progress bar (“Uploading 12/47…”) and reports how many recordings were sent when it finishes.
Filtering the View
Shooter
Choose whose data to show. The charts load once a shooter is selected.
Round / Course
Limit to a single discipline or course.
Stand
Focus on one station — aim tendencies often differ by stand.
From / To
Restrict to a date range to compare sessions over time.
Tracker only
Show only recordings that include tracker data.
Trend (rolling avg)
Set the window size for the trend lines on the timing chart.
What the Numbers Mean
Time to shot
From the release call to the first shot — how long you took to break the target.
Reaction time
Release to gun mount: how quickly the gun starts moving after the call. The one tracker-only metric — blank on recordings shot without one.
Hit rate & Avg force
Share of targets broken, and the average break force on hits.
Tracker coverage
Share of recordings that include tracker data — the basis for the reaction-time metric. Everything else works without it.
Horizontal bias
Pellet-cloud centre versus the clay, side to side, from your viewpoint (left / right).
Vertical bias
The same offset measured up and down (high / low).
Lead / trail
Cloud centre along the line of sight — ahead of the clay (long) or behind it (short).
Recordings
How many presentations are in the current filtered view.
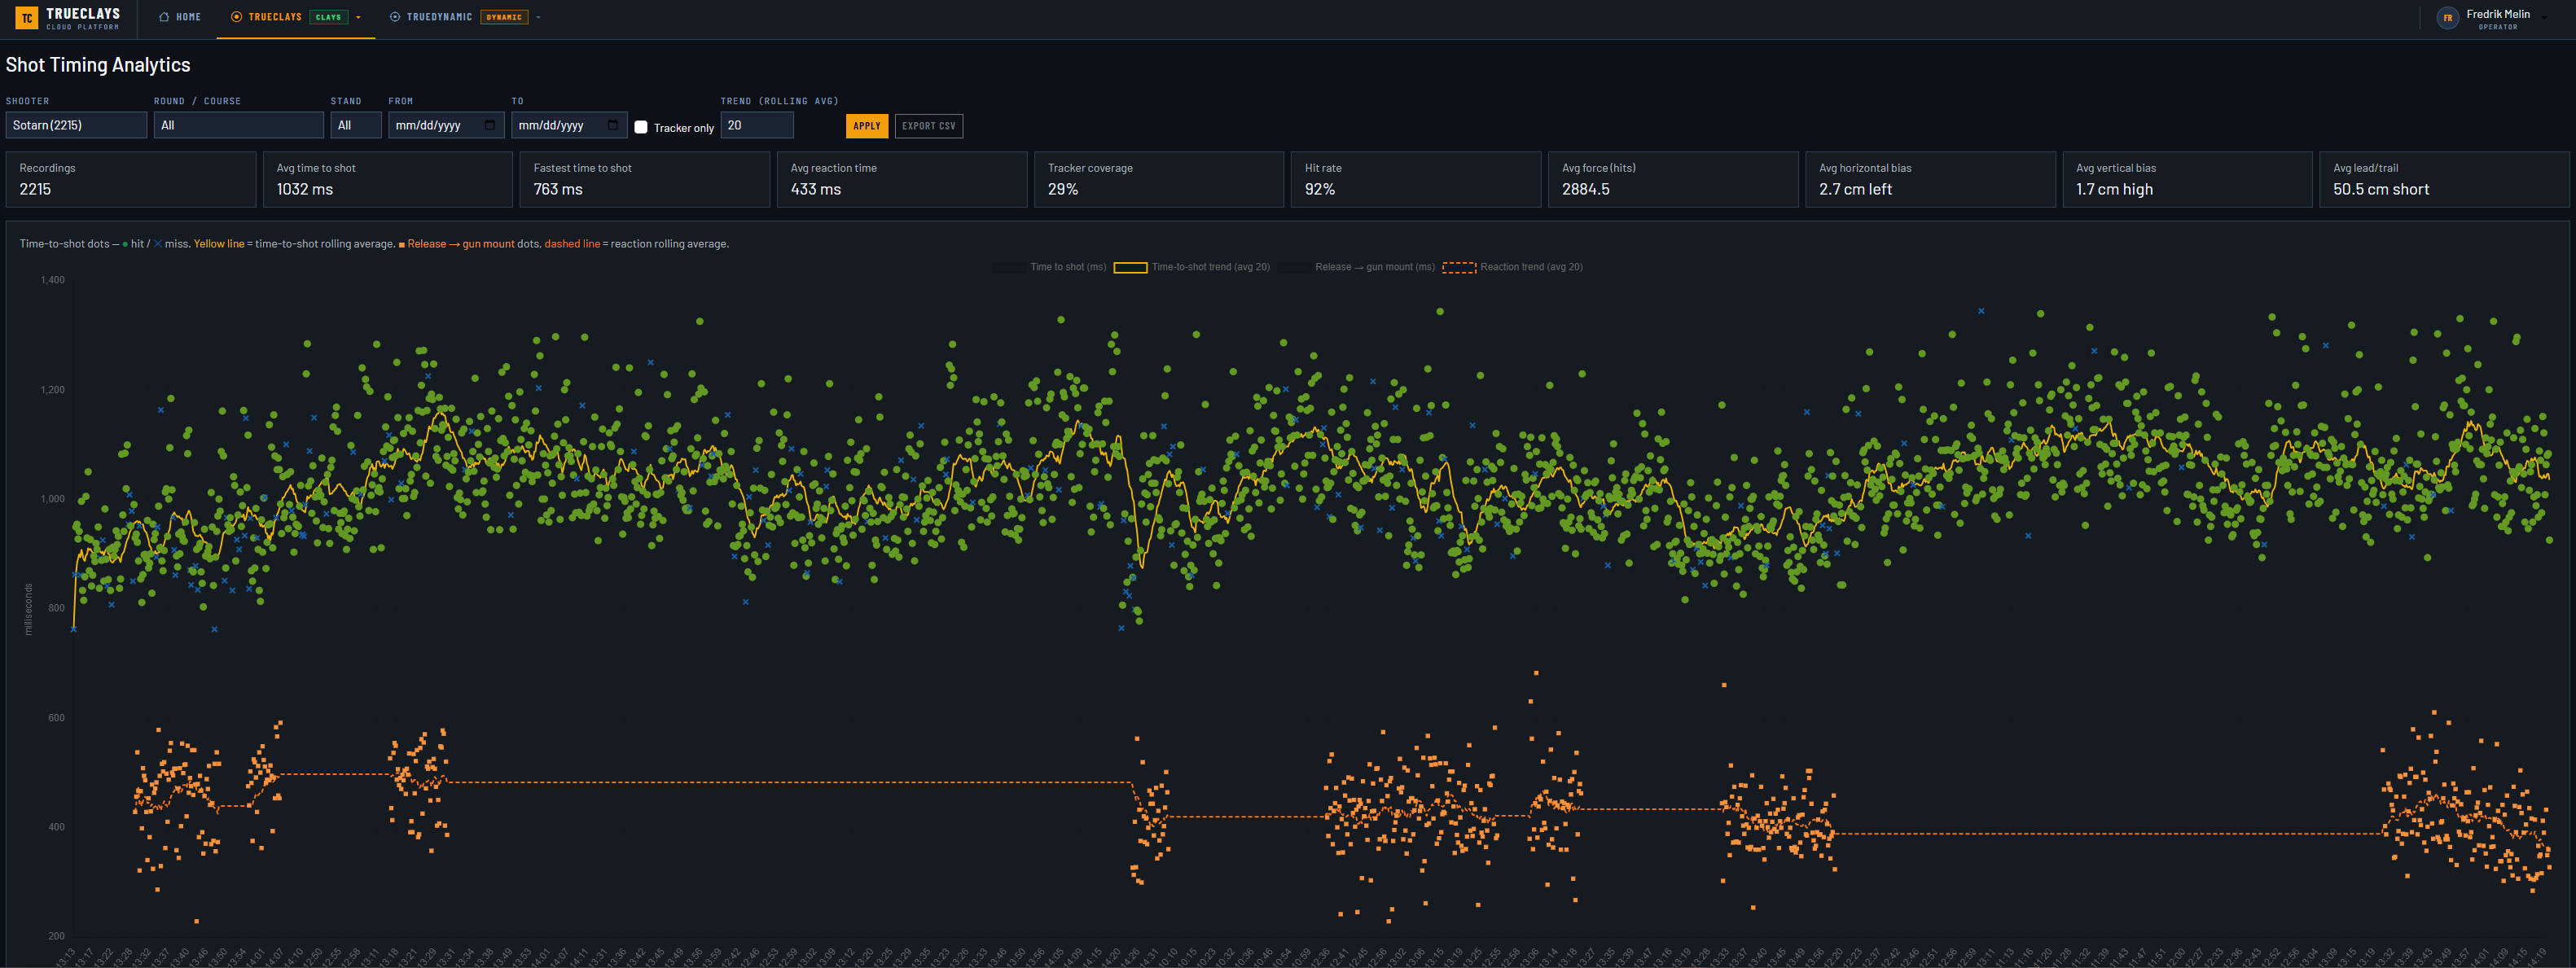
Reading the Charts
Timing & Aim
Two views: how your timing trends, and where your pattern lands.
Timing trend
Each dot is one target, in milliseconds over time; the lines are rolling averages.
- Time to shot — hit
- Time to shot — miss
- Time-to-shot trend
- Release → gun mount
- Reaction trend
Aim grouping
A view from behind the gun: each point is one recording's pellet-cloud offset from the clay, with the crosshair dead-centre on the target. Points to the right sit right of the clay, points up sit high. Hits are green, misses red — so a cluster pulled to one side reveals a consistent aim bias.
Export
Export CSV downloads the current table with all active filters applied — ready for a spreadsheet or your own analysis.
Private to Your Account
The analytics page only ever shows data tied to the account it was uploaded to.
- ★ A fresh account starts empty and fills in as you upload.
- ★ Upload many shooters' recordings under your own account and review them all in one place.
- ★ No one else sees your data — there's nothing admin-only on the page.
Always Up to Date
Improved a session? Just upload those shooters again — matching recordings overwrite in place, so the trends stay current without duplicates.
Timing, hit rate, force and aim grouping come from the recording itself, so they're there whether or not a tracker was used. Reaction time is the one metric read from the tracker path — it fills in for recordings shot with one.
Troubleshooting
| Symptom | Fix |
|---|---|
| “No cloud account found” when uploading | The e-mail must match an existing TrueClays Cloud account. Register or sign in on cloud.trueclays.com first, then use that exact e-mail. |
| The web page is empty | You only see data tied to your account. Make sure you uploaded to the same e-mail you're logged in with, and that you've selected a shooter. |
| Reaction time is blank | Reaction time needs a tracker. Recordings shot without one will show every other metric but leave this empty — that's expected, not a fault. |
| Aim grouping has no points | Grouping comes from the pellet and clay positions, not the tracker. If it's empty, re-upload from the current build — older uploads predating the feature need re-processing (re-uploading the same files is enough). |
| The charts don't appear | Pick a Shooter first — the charts and table only load once a shooter is selected. |
| An old session looks wrong after re-shooting | Re-upload that shooter. Matching recordings overwrite in place, so the latest values replace the old ones. |