
Compak Sporting
Course designer
Build your own Compak courses: place the traps, set what each one throws, write the shooting menu, then save it and send it to anyone. Your courses sit alongside the built-in ones and are shot the same way.
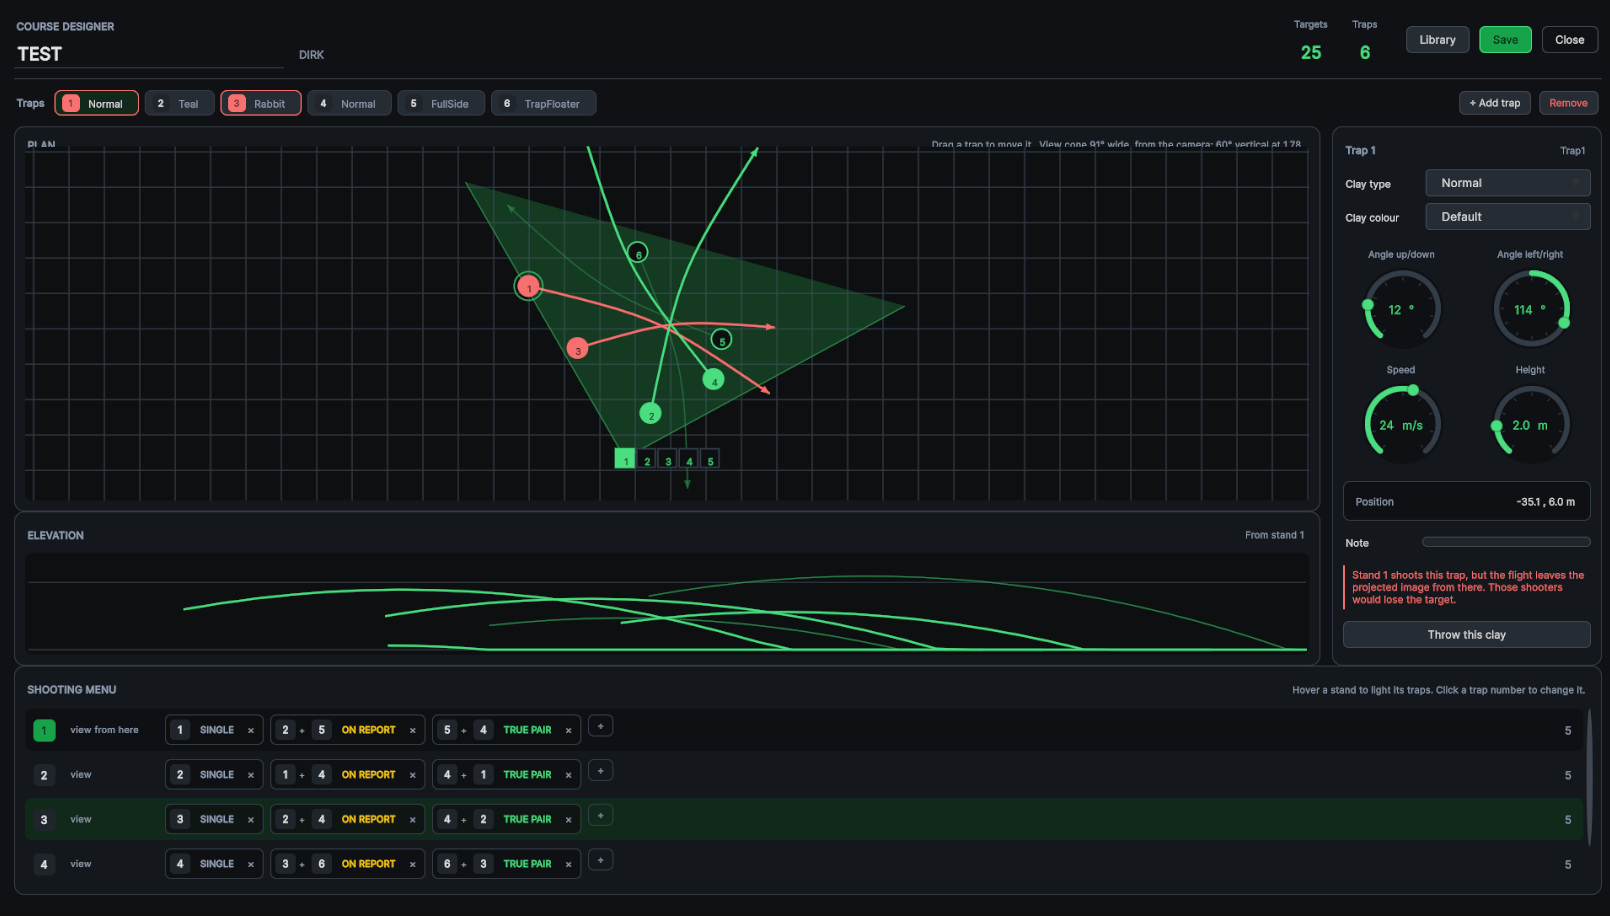
Every trap and every flight drawn at once — a course reads as one shape rather than six settings screens.
What a course is
Two halves, and the designer shows you both at the same time. That is the whole idea behind the screen.
The traps are the machines: where each one stands, which way it throws, how fast, how high, and what kind of clay it puts out. A course can use up to fifteen.
The shooting menu is what each of the five stands shoots, in order, and whether each shot is a single, a pair on report or a true pair.
The stands themselves never move. They belong to the range, not to the course, which is why you only ever place traps.
The map is the document
A course edited one trap at a time has no overview. Here every flight is drawn at once, so you can see the shape of the whole course while you change one part of it.
Three buttons, three jobs
In the Compak menu. They are deliberately separate — choosing a course to shoot is not the same as changing one.
Course designer
Opens the editor, to build a new course or change an existing one. Nothing you do here affects a round until you load the course.
Load course
Shows your saved courses and lets you pick one to shoot. It does not open the editor and it cannot change anything.
Start round
Shoots the course you loaded. With nothing loaded it shoots the built-in course the dropdown names, exactly as before.
The screen
Everything except the map is a way of changing whatever is selected on it.
Plan
The field from above, with every trap and every flight drawn — the selected one bright, the rest dimmed.
Drag a trap to move it. The arrow keys nudge it half a metre, or two metres with Shift.
Elevation
The same flights from the side, measured from the stand you are looking from.
Height and up-angle are invisible from above, so this is where you check that a tower clears the treeline and a rabbit stays on the floor.
Trap settings
Clay type and colour, then four dials: angle up and down, angle left and right, speed and height.
Drag a dial, nudge it with the arrow keys, or click the number and type it.
Traps
One chip per trap, showing its number and clay. Click a chip to select that trap.
Add trap drops a new machine in front of the middle stand. Remove takes the selected one out.
Shooting menu
One row per stand, holding that stand's shots in the order they are called.
Hover a row and only that stand's traps light up on both views.
Library
Your saved courses, and the buttons that move them between machines: New, Duplicate, Import, Export and Delete.
Each thrower carries its number in the field itself, floating above the machine, so the map and the range always agree about which trap is which. The numbers appear only while the designer is open.
Building a course
-
1
Open Course designer, press Library, then New — or simply start from the course that opens.
-
2
Name it, and put your own name in the field beside it. The name is what other shooters will see.
-
3
Place the traps. Drag each one on the plan, then set its clay, angle, speed and height on the right.
The flight redraws as you go, and the machine out in the field moves with it — what you see on the map is what is standing on the range.
-
4
Write the menu along the bottom: for each stand, which traps and in what combination.
-
5
Test the targets you are unsure about with Throw this clay, then press Save.
Writing the shooting menu
Everything on a row is clickable, and the menu cannot be clicked into a state the field disagrees with.
| Click | What happens |
|---|---|
| A trap number | Steps to the next trap the course places — never one you have not put out |
| The label | Cycles single, on report, true pair, following pair; going single to pair adds the second trap for you |
| The cross | Removes that shot |
| The plus | Adds another shot to the stand |
| View | Looks at the field from that stand, moving the view cone and the elevation with it |
The number at the end of each row is that stand's target count, and the Targets figure at the top of the screen is the whole course.
That total is what the scoreboard uses, so a 24- or 30-target course scores correctly without anything else being set.
Removing a trap also removes every shot that called it, and the designer tells you how many it took out. Check the menu afterwards — those stands are now a target or two short.
The view cone
The one piece of feedback a placement tool cannot do without: a target nobody can see is not a target.
Your projector, not a typical one
The green wedge is the part of the world the projector can actually show from the stand you are viewing from. It is taken from the camera, so it matches your installation — throw distance, screen width and lens included.
A trap turns red when its target leaves that wedge from a stand whose menu calls it. The shooter standing there would lose sight of the clay. The trap chip is marked too, and the panel on the right names the stand.
Clays are expected to leave the screen eventually — only the launch and the first few metres have to be visible, which is the part you need in order to mount and shoot.
Red is judged only against the stands that actually shoot that trap. A wide trap sitting off to the side of a stand that never calls it is not a fault, so it is not flagged.
Testing a target
Throw this clay fires the selected trap for real — the same machine, the same clay and the same halo you get in a round.
The designer hides itself so you can watch the flight and comes back on its own after a few seconds. Click or press any key to bring it back sooner.
The plan cannot tell you everything
The map tells you where a clay goes. Only the throw tells you what it looks like from the stand — and that is what a shooter is actually judging.
Saving, and where courses live
A course belongs to the machine it was built on until you send it somewhere.
Save writes the course to this machine. Each course is given an identity of its own when it is created, and the file is named by that rather than by its title.
So renaming a course is only a change of text, two courses can share a name without colliding, and saving the same course twice replaces it instead of leaving copies behind.
Courses are kept in the TrueClays data folder under Courses\compak, one .json file each. They are ordinary text files, and an update does not touch them — a course you build stays yours.
Save always keeps your work
Save writes the course even when the designer is complaining about it. A course with a real problem is simply not offered to shoot until you fix what the message describes.
| Library button | What it does |
|---|---|
| New | Starts an empty course laid out on the field |
| Duplicate | Copies the open course under a new identity, leaving the original untouched |
| Import | Brings in a course somebody sent you |
| Export | Puts the course on the clipboard and writes a copy to Courses\export |
| Delete | Removes the open course from this machine |
Sharing a course
A course is one block of text, so it travels in a message. There is no file to hunt for.
-
1
Open the course, press Library, then Export. The course is now on your clipboard.
-
2
Paste it into a message, an email or a forum post and send it.
-
3
On the other machine, copy the text, open the library and press Import. It appears in the list, ready to shoot.
Files work too
Import also reads the newest file in Courses\export. Drop a course file in that folder and press Import.
Importing keeps both
Somebody else's changes to a course you built arrive as a second copy rather than replacing yours, so nothing is lost in a swap.
Shooting a course
-
1
Press Load course and pick one from the list.
-
2
The traps go out on the field and the list closes. Shoot it as you would any Compak round.
-
3
To go back to the built-in courses, choose one in the course dropdown and press Start round. That clears the loaded course and puts the range back as it was.
An ordinary Compak round
Scoring, the scoreboard, squad rotation, the control station and streaming all behave exactly as they do on a built-in course. The only difference is which targets come out.
Every machine builds its own round, so a custom course can only be shot where that course already is. Send it round and make sure everyone has imported it before you start.
If something looks wrong
| What you see | What to do |
|---|---|
| A red message across the top | Something would stop a round working — a stand calling a trap that is not placed, or a pair with one trap in it. The message names it; Save still works |
| Traps and flights drawn red | Those targets leave the projected image from a stand that shoots them. Move the trap, turn it, or take it off that stand's menu |
| A trap you cannot add | All fifteen trap positions are in use. Remove one you are not using |
| The round shoots the wrong course | A course is still loaded. Choose the course you want in the dropdown and press Start round, which clears it |
| Import does nothing | The clipboard did not hold a course. Copy the whole block of text, from the first brace to the last |
Limits
Fifteen traps
Per course. More than a Compak field normally carries — it is the ceiling, not a target.
Five stands
Fixed by the range, with as many shots on each as you want to write.
On the machine
Courses live on the system they were built on. Sharing is by clipboard or file, not yet by cloud.
A Compak course is six machines and a menu. Once you can see all of it at once, building one takes minutes — and the courses you build travel to every other TrueClays in the world.