
TrueDynamic · IPSC
Stage builder
Draw the walking path, drop the targets where you want them, and tell each stop what has to fall before the shooter moves on. The builder shows you the stage from above while you work, tells you when a stop cannot see a target it has been given — and lets you build at home in your browser, keep it in step with the Simulator, and send any stage to anyone with a short code.
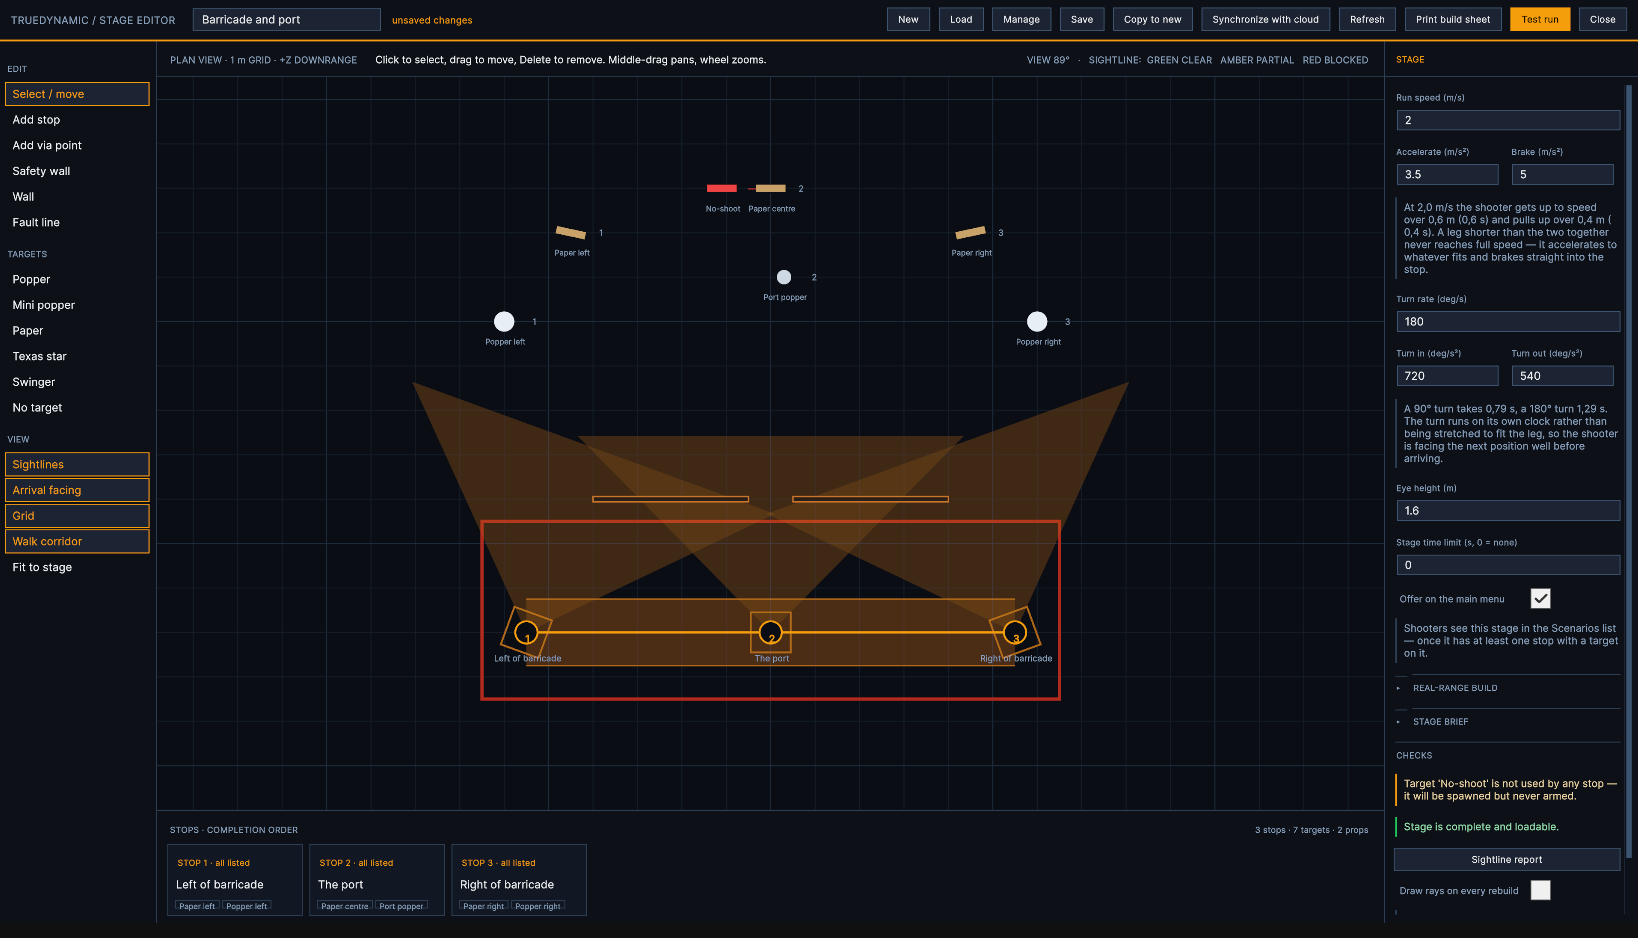
What a stage is
A walking path with stops along it, and targets the stops have to deal with.
At each stop the shooter halts, engages the targets assigned to that stop, and moves on when the stop's completion rule is satisfied. Between stops the rig walks — it accelerates, runs, and brakes into the next stop the way a person does.
Walls decide what each stop can see, and fault lines mark where the shooter may stand when the stage is built on a real range.
Build once, use it three ways
Everything you build is saved as a single file. The same file runs in the stage player, prints as a build sheet for pegging the stage out on a real range, and can be copied to make a variant without touching the original.
Opening the builder
Stage builder sits in the operator bar at the bottom left of the main menu. It opens with the stage you had open last time — it does not start you on a blank sheet unless there is nothing to reopen.
Online, log in to cloud.trueclays.com and press Stage builder on the home page. See The online stage builder below.
On a locked system the Stage builder button is absent. That is deliberate: the builder is left out of the build entirely, so there is nothing to find and nothing to unlock.
The screen
Five areas, and each one always does the same thing.
Top bar
The stage name, and whether it has unsaved changes. Then New, Load, Save, Copy to new, Synchronize with cloud, Refresh, Print build sheet, Test run and Close.
Rail
Three groups. Edit is what you place: stops, via points, walls and fault lines. Targets is the six target types. View toggles what the plan draws, and Fit to stage re-centres it.
Plan view
The stage from above, on a one-metre grid, with +Z downrange. Click anything to select it; drag it to move it.
The wheel zooms around the pointer; middle-drag or right-drag pans.
Stops strip
Every stop in completion order, with its rule and its targets. Click a card to select that stop.
Inspector
Everything about whatever is selected. With nothing selected it shows the stage itself. Delete at the top removes the selection.
What the plan draws
Sightlines, Arrival facing (each stop's view wedge), Grid and Walk corridor. Turn them off to see the layout plainly; they change nothing in the stage.
Starting a stage
Start from a template or from an empty sheet. A template is copied, never opened — the template itself cannot be changed.
Press New. If the stage on screen has unsaved changes you are asked to discard them first — New is the one button that could throw away an hour's work, so it asks.
The chooser lists the templates, each with its shape in one line — stops, targets, no-shoots and the longest shot — and a sentence on what it is for. Pick one, or press Start empty.
The copy has a new identity and starts unsaved. Give it a name and press Save.
| Template | What it is |
|---|---|
| El Presidente | Three papers from one position. The baseline the others are measured against |
| Barricade and port | One barricade, three positions; from each only one paper is open |
| Plate sweep | Steel in an arc from two positions |
| Swinger and star | A swinger behind a vision screen, and a Texas star |
| Field course | Four positions and a mix of everything — the one to start a real match stage from |
Building a stage
The order below is the one that causes the least rework. Nothing stops you doing it differently.
-
1
Start a stage
Press New and pick a template or start empty, or Load an existing stage to work from. Type the name in the top bar — it is what the shooter sees on the stage card.
-
2
Lay the path
Place stops in the order the shooter will walk them. Add via points where the path has to bend but the shooter does not halt — around a corner, or to keep the walk off a berm.
-
3
Put the walls in
Walls before targets. A wall decides what each stop can see, and it is easier to place a target in a gap than to discover afterwards that a wall closed one.
-
4
Place the targets, and give them to stops
Place each target, then tick it under Targets at this stop on every stop that has to engage it. Its position is described from its stop — distance and bearing rather than raw coordinates, the way a stage is described on a range.
-
5
Set each stop's rule
All targets down, a number of them, or a par time. See Stops and completion rules below.
-
6
Check the sightlines
Turn on Sightlines in the rail and press Refresh. Every red line is a stop that can never finish. Fix them now.
-
7
Test run it
Test run plays the stage exactly as the player will. Walk it once before you call it finished.
-
8
Save
Save asks before it writes over anything. Copy to new asks for a name and leaves the original alone.
Placing, moving and deleting
Two ways to place, and they do the same thing.
Click a rail button and then click the plan, or drag the rail button straight onto the spot you want. Dragging is quicker for one object; clicking is quicker for six of the same kind.
Select / move is the resting tool. Click anything to select it; drag it to move it. To delete, select and press Delete — the keyboard key works too. Either way you are asked to confirm, and the message names what is about to go and what else was using it.
Deleting a target removes it from every stop that was using it. If that leaves a stop with nothing to shoot, the Checks section will say so — but it will not stop you.
Stops and completion rules
A stop holds the shooter until its rule is satisfied. Select a stop to set it.
| Rule | The stop releases when |
|---|---|
| All listed targets down | Every target assigned to this stop has been neutralised. The usual choice |
| A number of them are down | The count you set is reached, whichever targets they were. Use it when the shooter may choose their targets, or when one is there as a decoy |
| Par time expires | The par time runs out, hit or miss. Anything still standing scores as a miss |
Facing on arrival
Which way the shooter is looking when they arrive. Set it so the targets are in front of them, not behind their shoulder. Drag the dial, or type the degrees.
Speed in
Overrides the stage run speed for the walk into this stop. Leave it at zero to use the stage setting.
Targets at this stop
Every target in the stage, with a tick for the ones this stop must engage, the hits each needs, and a sightline state beside each. Paper starts at two hits, a Texas star at five, steel at one.
View this stop
Drops you into the shooter's eyes at that stop, facing the way they will face. The quickest way to answer “what does the shooter actually see from here”. Back to editor returns you to the plan.
A shooting position on a real range is a box on the ground. Under Shooting box (real range only) set its width and depth, or press Standard IPSC box for 0.9 × 0.9 m. It is drawn on the plan and printed on the build sheet; the simulator does not hold the shooter to it.
Targets
Six types. They score and fall differently; everything else about them is the same.
Popper
Full-size steel. Falls when hit. Counts as one target down.
Mini popper
The same, smaller. Use it to make a shot harder without moving the stop back.
Paper
Scored by zone through the target face, so where the shot lands matters. Paper hits appear in the shot view during a run.
Texas star
A rotating star of plates. Counts as complete when every plate is down.
Swinger
Paper on a moving arm. Put a wall in front of one to make the window narrow.
No target
A no-shoot. Hitting it costs points. It is never something the shooter has to engage, so it is not part of any completion rule. Any target can be made a no-shoot with its tick box.
Select a target and the inspector gives you its distance from the stop that owns it and a bearing dial. Click and drag the dial, or type the number. A second dial sets which way the target faces — square to the shooter unless you have a reason. Height lifts it off the ground.
Used by lists every stop that engages it — the fastest way to find a target nobody shoots.
Decimals are accepted in every distance and size field — 12.5 is a valid distance. The plan updates when you leave the field, not on every keystroke.
Walls
Two kinds, and the difference is what they are for rather than how they behave.
Safety wall
The netted IPSC wall. Use it for the barriers a real stage is built from — the ones that define the bays and the shooting positions.
Wall
A plain panel. Use it to hide something: in front of a swinger, across a gap, as a vision barrier between two stops.
Both take a width and a height in metres, and an angle. The angle dial drags like the bearing dial — click and pull it round. The plan redraws when you let go.
Fault lines
The boards laid on the ground that the shooter may not step on or beyond. Straight runs only — a batten does not bend.
Drawing one
-
1
Pick Fault line in the rail and click the corners in turn. Boards snap to 45° and half-metres; hold Shift to place freely.
-
2
Each board shows its length as you draw. Backspace takes the last corner back.
-
3
Click the first corner to close it into a shooting area, or press Enter to leave it open against a wall or the berm.
Generate fault lines
Under Real-range build in the stage settings, Generate fault lines draws a closed outline round the walk corridor, the stops and their shooting boxes, snapped to half-metre boards.
If the stage already has fault lines you choose whether to add the new outline or replace them. Board colour sets red or black, the way they will be painted.
Select a fault line to drag it whole, or a corner to move just that corner. The inspector lists every board with its length and angle — the cutting list for the day you build it.
Sightlines
The check worth making every time. A stop given a target it cannot see will never complete — and nothing about the stage file is wrong, so nothing else will catch it.
Turn on Sightlines in the rail and press Refresh. The builder traces a line from the shooter's eye at each stop to each of that stop's targets through the 3D stage, and colours it.
Select a stop to see its lines, or a target to see every stop that engages it. The stops strip and the target lists use the same colours.
| Line | Means |
|---|---|
| Green | Clear line of sight. Nothing to do |
| Amber | Partly hidden, with the visible fraction shown. Usually intentional — check it is as hard as you meant |
| Red | Blocked. This stop can never complete. Move the target, move the wall, or take the target off this stop |
| Grey | Not checked yet. Press Refresh |
A red line with nothing obviously in the way? Press Sightline report in the Checks section — it names the object that stopped each ray. Turn on Draw rays on every rebuild and the rays are drawn in the scene too.
How the shooter moves
The rig does not slide between stops at a fixed speed. It accelerates away, runs, and brakes into the stop — and it turns the same way.
| Setting | What it does |
|---|---|
| Run speed | Top speed on a leg, in metres per second |
| Accelerate | How hard it gets up to speed. Lower is heavier |
| Brake | How hard it pulls up into a stop. Normally higher than accelerate — stopping is quicker than starting |
| Turn rate | Top turning speed, in degrees per second |
| Turn in / Turn out | How quickly the turn builds and how quickly it settles |
| Eye height | Where the shooter's eye sits. Sightlines are traced from here, so it changes what a wall hides |
The inspector works the numbers out for you: how far and how long it takes to reach run speed, how far to stop, and how long a 90° and a 180° turn take. On a short leg the rig never reaches run speed — which is why raising it on a tight stage changes nothing.
Stage settings, brief and checks
Click empty ground to deselect, and the inspector shows the stage itself.
Name and limits
Name is what the shooter sees on the stage card — not the file name. Stage time limit is a ceiling on the whole run; zero means none.
Offer on the main menu turns a stage you are still working on out of the scenario list.
What the competitor reads
Procedure, start position, ready condition, start signal, stop on, penalties, safety angles, scoring and match. Leave any empty and the usual IPSC wording is used.
It opens with the counts: rounds, points, course length, and how many paper, poppers, plates and no-shoots.
A running verdict
Whether the stage is complete and loadable, and what is wrong if it is not — a stop that finishes instantly, a count that cannot be reached, a target nobody shoots.
| The brief counts it | As |
|---|---|
| Paper and swinger | Two rounds each |
| Popper and mini popper | One round each |
| Texas star | Five plates, one round each |
| No-shoot | Nothing |
| Maximum points | Five per round (Comstock) |
| Course length | Short up to 12 rounds, Medium up to 24, Long up to 32 |
Building the stage for real
Two sections of the inspector are folded away by default, because they mean nothing in the simulator. Open them when the stage is going to be pegged out on a real range.
Walk corridor width (stage, Real-range build) is how wide the walking lane is, in metres. It appears on the plan when Walk corridor is on and on the build sheet. Zero means no corridor. TrueDynamic itself imposes no such limit — this is for the people laying the stage out.
Shooting box (stop, Real range only) is the box the shooter stands in at that stop.
Print build sheet
Produces a page with the plan, the walking path, the fault lines and the measurements someone needs to set the stage up on the ground. It describes the stage as it is — if a distance is odd, the sheet says so rather than round it.
Test run
Test run plays the stage from the builder, using the same code the stage player uses. It waits for the timer, the way a real run does: the stage loads, the rig parks at the first stop, and nothing moves until the start signal.
Back to editor returns you to the plan with your stage as you left it.
No separate preview mode
What you see in a test run is what the shooter gets. There is no preview that behaves differently, so a stage that tests well shoots well.
Saving, and where stages live
Saving always asks before it replaces anything.
| Button | What it does |
|---|---|
| Save | Writes the stage, asking first if it would replace one. If you renamed it, Save as new stage is offered first — a rename usually means you want a copy |
| Copy to new | Asks for a name and saves a separate stage. The one you opened is left exactly as it was. This is how you make a variant |
| New | A template or an empty stage. You are warned first if the current one has unsaved changes |
| Load | Every stage on this Simulator, your own first. A factory stage opens as a copy |
| Manage | The same list with Open and Delete. Factory stages cannot be deleted |
| Synchronize with cloud | Connects this Simulator to your cloud.trueclays.com account, keeps your stages in step with it, and gets a stage with a share code — see below |
A stage is filed by an identity it is given when it is created, not by its name. So renaming is only a change of text, two stages can share a name, and the cloud recognises the same stage on another Simulator. Your stages are kept in the TrueDynamic data folder under Stages, one .json file each; an update does not touch them.
A factory stage that ships with the system is read-only. It opens as a copy, so an edit always has somewhere to go — save it and it becomes one of your own stages.
The online stage builder
The same builder, in a web browser. Design at home, run it on the range.
Log in to cloud.trueclays.com and press Stage builder on the home page. You get your cloud library and New stage — with the same templates. Open a stage and it is the builder you know: rail, plan with zoom and pan, stops strip, inspector, fault lines, Generate fault lines, stage brief and checks.
What you save there is in your cloud library; the Simulator fetches it the next time you press Synchronize with cloud. Load also imports and exports stage files.
If the same stage was changed on a Simulator while you had it open, Save asks before overwriting it.
What only the Simulator can do
Refresh, Print build sheet, Test run, View this stop, Sightline report and Draw rays need the 3D stage, so online they are greyed out with a dashed SIMULATOR tag.
Sightlines online are always grey — not checked. Press Refresh on the Simulator before you trust a stage.
Connecting and synchronising
Connect a Simulator once. After that one button keeps it and your cloud library in step — and it never overwrites anything without asking.
Connecting a Simulator — once
-
1
In the stage builder, press Synchronize with cloud. Type the email you log in to cloud.trueclays.com with and press Connect.
-
2
A code such as
GHOST-7742appears on the Simulator. At the same time a yellow bar appears at the top of cloud.trueclays.com for that account. -
3
Check the two codes match and press Approve. Within a few seconds the Simulator says it is connected. It stays connected until you press Disconnect, or remove it under Connected devices on the website.
This is the same connection your shooter profiles use. If this Simulator's profile is already linked to your account, it is already connected — no second approval. Disconnecting here also stops profile sync, and the window says so before it does it.
What a synchronisation does
| The stage is | What happens |
|---|---|
| Only on this Simulator | Sent to the cloud. No question — nothing is overwritten |
| Only in the cloud | Brought to this Simulator. No question |
| In both, and the same | Left alone |
| In both, and different | You are asked. Both copies are shown with when they were saved, the newer one marked. Choose: overwrite the cloud, overwrite this Simulator, keep both (the cloud's is saved as a copy), or skip |
| Deleted online, still here | You are asked whether to put it back in the cloud or leave it out |
With many stages to go through, tick Do the same for the rest and the remaining questions answer themselves the same way.
Only saved stages are synchronised. With unsaved changes on screen you are warned first, and can synchronise the saved ones anyway. A stage replaced by the cloud's copy is reopened. Factory stages are never sent — save a copy first.
Nothing is ever deleted by a synchronisation, in either direction. Deleting a stage is always something you do yourself, on one side.
Sharing with a code
Send one stage to somebody else's Simulator — a club, a match director, a customer — without giving them anything else.
Making a code — online
-
1
Open the stage in the online stage builder and press Share.
-
2
Choose how long it works — 1, 7 or 30 days — and, if you like, once only. Press Create code.
-
3
You get a code such as
STAGE-7K4QM-2XD9P. Copy it, read it out, put it in a message.
Getting a stage — on the Simulator
-
1
Press Synchronize with cloud, then Get with code.
-
2
Type the code. Capitals and dashes do not matter. Press Get.
-
3
The stage arrives and opens in the builder, ready for Test run. If this Simulator already has it, you are asked: overwrite, keep both, or skip.
Works on any Simulator
The Simulator does not have to be connected to anyone. A public installation can take a stage from a customer who walks in with a code.
Exactly as it was
The code carries the stage as it was saved when the code was made. Later changes are not included — make a new code for a new version, and it lands on the same stage, after asking.
Nothing else goes with it
A code gives that one stage. It cannot show your library, and it cannot see into the Simulator that uses it.
The Share panel lists every code you made for the stage: whether it is still active, when it runs out, how often it has been used and by which Simulator. Revoke stops a code at once; anyone who already used it keeps their copy.
If something is not right
| What you see | What to do |
|---|---|
| A stop never releases during a test run | It has a target it cannot see. Turn on Sightlines, press Refresh, look for the red line |
| A sightline is red but nothing is in the way | Press Sightline report. It names the object that stopped the ray — often something you would not think of as an obstacle |
| “Stage has no stops on the path” | There is nothing to run. Add at least one stop |
| “Stop has no shootable target — it completes instantly” | Tick at least one target under Targets at this stop, or give the stop a par time |
| “Requires 4 of 3 shootable targets — impossible” | The count is higher than the targets the stop has. Lower the count or give it more targets |
| A target is in the stage but nobody shoots it | It is not ticked on any stop. The target's Used by line tells you at once |
| The stage is not in the main menu | Check Offer on the main menu, and that the stage has at least one stop and one target |
| Raising the run speed changes nothing | The legs are too short to reach it. Lengthen them, or raise Accelerate instead |
| The plan is empty or off-screen | Press Fit to stage |
| Sightlines are grey online | That is expected — they are checked against the 3D stage. Refresh on the Simulator |
| “This Simulator is no longer connected” | It was disconnected under Connected devices on the website. Connect it again |
| “That code is not valid” | Mistyped, run out, once-only and already used, or revoked. Ask for a new one |
| “That code is for a TrueClays Compak course” | The code is fine, but it belongs to the TrueClays course designer |
Limits
Sightlines need the Simulator
They are traced through the 3D stage, so only the Simulator can check them. The online builder shows them grey.
Read-only
They open as copies, cannot be deleted, and are never sent to the cloud. Save a copy to make one your own.
On the Simulator, and in the cloud
Every stage is a file on the Simulator. Synchronising keeps a copy in your cloud library, and share codes last 1, 7 or 30 days.
A stage is a path, some stops and what has to fall at each. Once you can see all of it from above — and see what each stop can see — building one takes minutes, at the range or at home, and with a code it runs on every other TrueDynamic in the world.